Make your backend more reliable using Nginx caching proxy
Most of us are familiar with Nginx - it’s a very popular Web Server and Reverse Proxy. But do you know that you can also use it as a Caching Proxy?
Now, you’re probably wondering why would anyone want to do something like that - can’t you just update your service to cache data in Redis or Memcached? What are the upsides of externalizing the cache to a separate layer outside your service?
These are some scenarios where this might be useful:
- You want to serve cached data even when your service goes down
- You want to serve cached data when your service takes too long to respond
- You want to protect your service when there’s a lot of load
- You have a legacy system that you want to be made more reliable and performant but you can’t change the code
- You want to make a external 3rd party service more reliable and performant
- You’re using a polyglot microservices architecture and want a standard way of caching requests
Now that you’re interested, let’s go through the implementation one step at a time.
Simple proxy
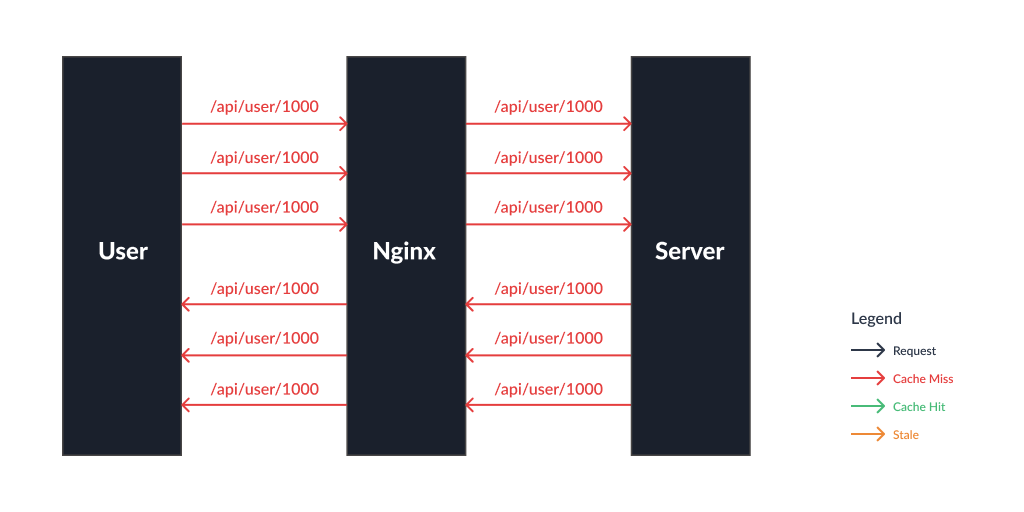
Let’s start off with a simple implementation. You have a Nginx server that just proxies all the calls to your backend service without any caching.
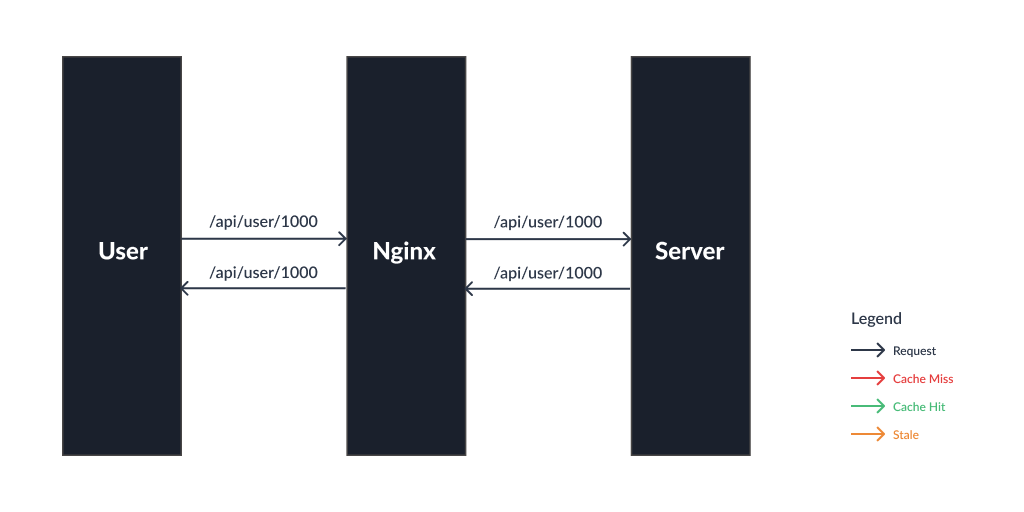
This is what the Nginx config would look like:
events {
    worker_connections 1024;
}

http {
    server {
        listen 3000;

        location / {
            proxy_set_header Host $host;
            proxy_pass http://my-backend-service/;
        }
    }
}
This runs the Nginx server in port 3000 and proxies all requests to http://my-backend-service/
Read more: proxy_pass, proxy_set_header
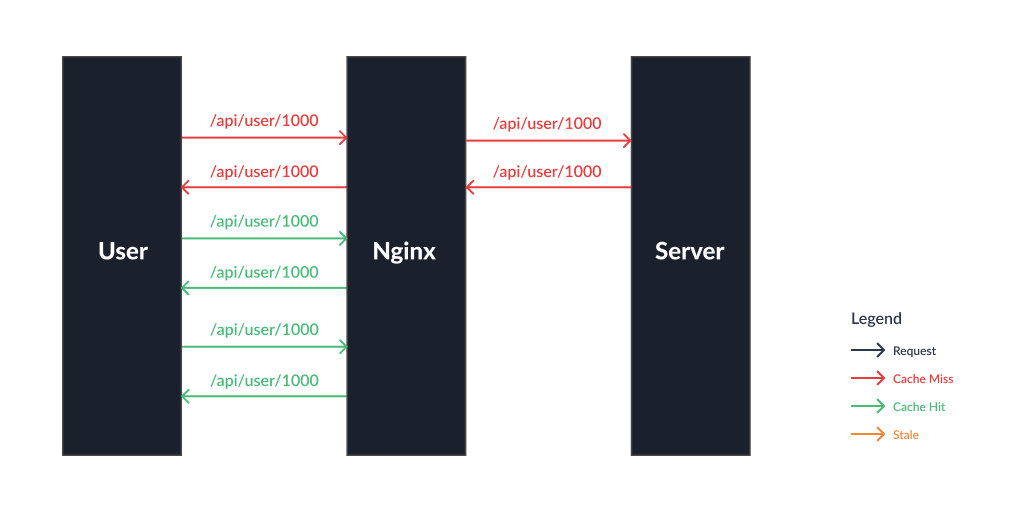
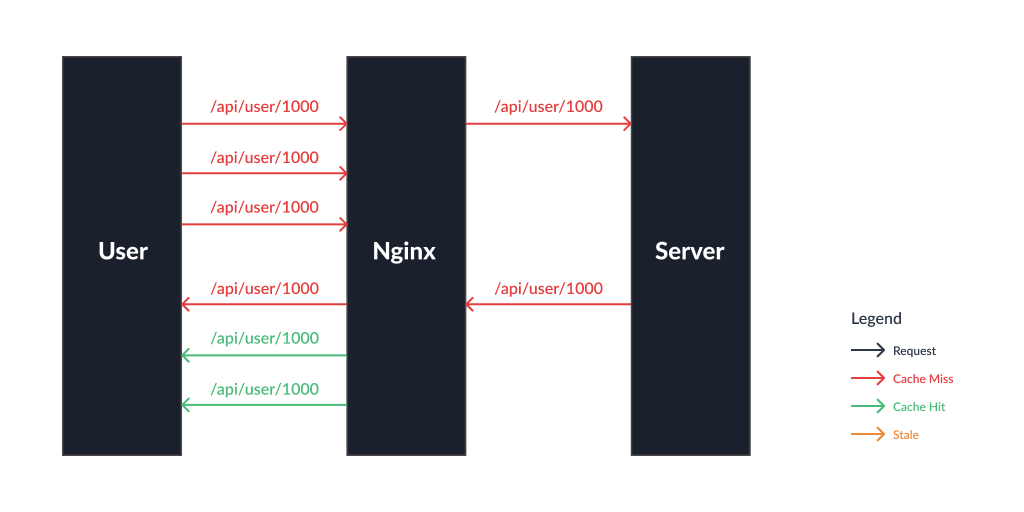
Simple cache proxy
Now let’s extend the above example with caching.
events {
    worker_connections 1024;
}

http {
+   proxy_cache_path /var/cache/nginx keys_zone=my_cache:10m;

    server {
        listen 3000;
+       proxy_cache my_cache;

        location / {
            proxy_set_header Host $host;
            proxy_pass http://my-backend-service/;
+           proxy_cache_key $scheme://$host$uri$is_args$query_string;
+           proxy_cache_valid 200 10m;
        }
    }
}
Some new directives are added, let’s go through them one by one. Nginx caches the responses in the disk, proxy_cache_path specifies the path where the responses are to be stored. proxy_cache defines the shared memory zone used for storing the cache keys and other metadata. proxy_cache_key defines the caching key. proxy_cache_valid specifies cache expiry, which can also be configured dynamically by sending cache headers from your backend service. Once the cache expires, the responses are no longer considered “fresh” and become “stale”.
Nginx doesn’t immediately delete the stale responses and keeps them in disk. The reason why it doesn’t delete them would become more apparent in next few sections. We can use the parameter called inactive in the proxy_cache_path directive to control how long to keep the stale responses in disk before deleting them. It might be initially confusing how the proxy_cache_valid and inactive configuration work together as they seem to be doing similar things, let’s use the following example to understand this clearly:
If the proxy_cache_valid is set to 5m and inactive is set to 10m. If the first request comes at time T0 minutes and next request comes at T6 minutes, the second request would need to fetched from the backend service even though the data would still be in the disk as the cache has expired. If instead, the proxy_cache_valid is set to 10m and inactive is set to 5m, and the first request comes at time T0 minutes and next request comes at T6 minutes, even though the cache has not expired, the data is deleted from the disk so it needs to be fetched from backend service again.
Read more: proxy_cache_path, proxy_cache, proxy_cache_key, proxy_cache_valid
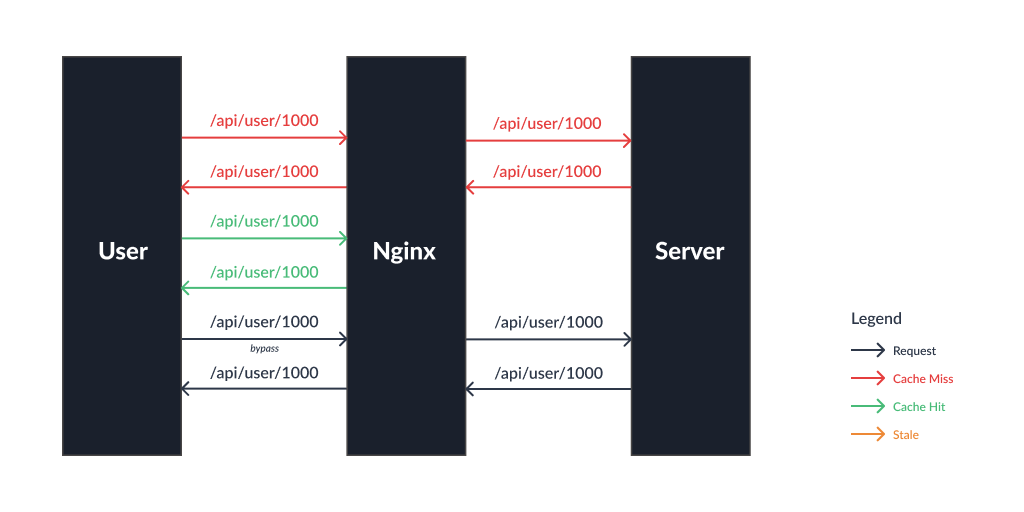
Temporarily bypass the cache
Sometimes you would need to temporarily bypass the cache and directly hit the backend service.
events {
    worker_connections 1024;
}

http {
    proxy_cache_path /var/cache/nginx keys_zone=my_cache:10m;

    server {
        listen 3000;
        proxy_cache my_cache;

        location / {
            proxy_set_header Host $host;
            proxy_pass http://my-backend-service/;
            proxy_cache_key $scheme://$host$uri$is_args$query_string;
            proxy_cache_valid 200 10m;
+           proxy_cache_bypass $arg_should_bypass_cache;
        }
    }
}
Here, we’ve added the proxy_cache_bypass directive with $arg_should_bypass_cache variable. If the request is sent with ?should_bypass_cache=true query param, then the cache would be bypassed. You can also use cookies or HTTP headers instead of query params.
Read more: proxy_cache_bypass
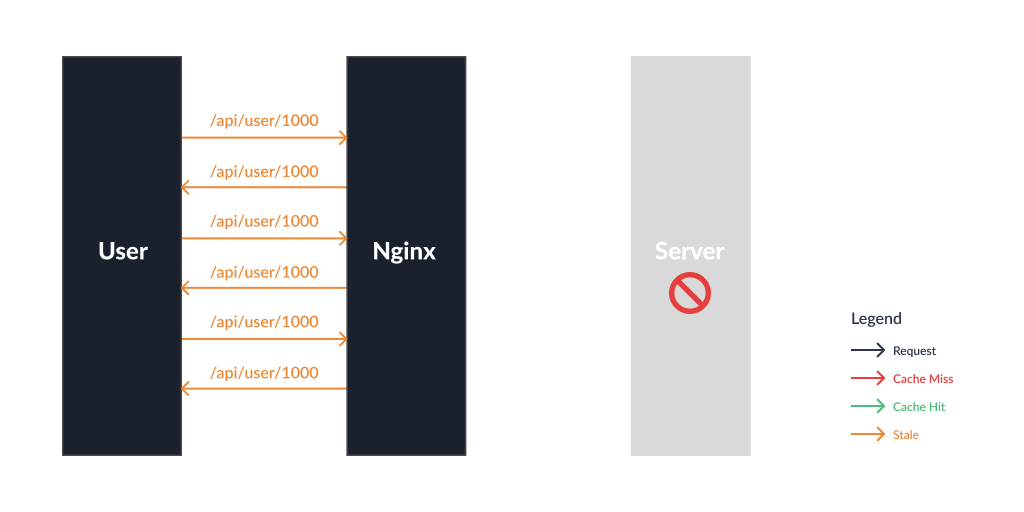
Serve cached data when backend is down or slow
This is the killer application for using a separate caching proxy. When the backend service is down or takes too long to respond, we can configure Nginx to serve stale responses instead.
events {
    worker_connections 1024;
}

http {
-   proxy_cache_path /var/cache/nginx keys_zone=my_cache:10m;
+   proxy_cache_path /var/cache/nginx keys_zone=my_cache:10m inactive=1w;

    server {
        listen 3000;
        proxy_cache my_cache;

        location / {
            proxy_set_header Host $host;
            proxy_pass http://my-backend-service/;
            proxy_cache_key $scheme://$host$uri$is_args$query_string;
            proxy_cache_valid 200 10m;
            proxy_cache_bypass $arg_should_bypass_cache;
+           proxy_cache_use_stale error timeout http_500 http_502 http_503 http_504 http_429;
        }
    }
}
We’ve updated proxy_cache_path with the inactive parameter mentioned before and have added proxy_cache_use_stale directive with the following params:
error - use stale if backend can’t be reached
timeout - use stale if backend takes too long to respond
http_xxx - use stale if backend returns these status codes
The timeout is set to 60s by default and can be configured using proxy_connect_timeout directive.
Read more: proxy_cache_use_stale, proxy_next_upstream, proxy_connect_timeout
Prevent cache stampede
If you have an endpoint that’s slow and computationally expensive, and if there are many concurrent requests to that endpoint, the cache won’t be very helpful in reducing load to your backend service. This is called as “cache stampede” and in order to prevent this, we can use the proxy_cache_lock directive.
events {
    worker_connections 1024;
}

http {
    proxy_cache_path /var/cache/nginx keys_zone=my_cache:10m inactive=1w;

    server {
        listen 3000;
        proxy_cache my_cache;

        location / {
            proxy_set_header Host $host;
            proxy_pass http://my-backend-service/;
            proxy_cache_key $scheme://$host$uri$is_args$query_string;
            proxy_cache_valid 200 10m;
            proxy_cache_bypass $arg_should_bypass_cache;
            proxy_cache_use_stale error timeout http_500 http_502 http_503 http_504 http_429;
+           proxy_cache_lock on;
        }
    }
}
This will ensure that only one request goes to your backend service and others wait for it to come back. One downside of this directive is that it adds extra 500ms latency to the requests that have been waiting.
Read more: proxy_cache_lock
Conclusion
As you can see, with a few lines of code, we can easily add caching to your services. While the cache only works at the public endpoint level, it should act as a good starting point and later Redis etc can be added for caching intermediate calculations within your service. Since it’s a separate proxy, it can also be added between your backend and legacy or external services.
Thanks for reading! Feel free to follow me in Twitter for more posts like this :)